Showing posts with label Mini Treat Bag Thinlits Dies. Show all posts

Wednesday, June 20, 2018

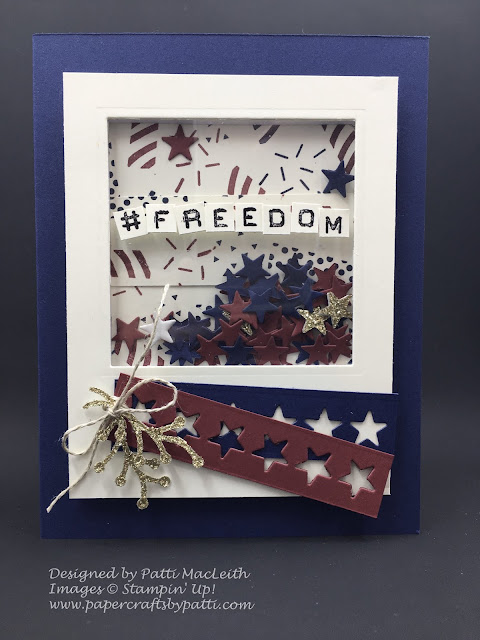
#Freedom


I found myself with this "window" sitting on my desk, I decided to make a shaker card. Now, I am not very good at making them! But I had an idea for using all these negative star strips left over from another project (you will see tomorrow). Also, the print behind the window is leftover (from same project) 1" strips of designer series paper that I created myself. I used the Perfect Birthday candles and confetti to look like firecrackers. They are stamped in Cherry Cobbler and Night of Navy ink.

The card is for my son, whose favorite holiday is 4th of July.

Also looks very nice in Black and White! 

It's a good thing that I don't make more than one 4th of July card! This one took quite awhile and I would not have been able to duplicate it over and over without going a little crazy!

Thanks for looking. Please leave a comment so I know what you think of my project.

Use my Online Store any time to order your very own Stampin' Up! products.


post signature

Thursday, February 1, 2018

Merci!


Julie DiMatteo is one of my stamping friends and she is genuis when it comes to making and sharing instructions to 3-D items. I watched her wonderful video on how to make this Merci chocolates box. The box holds 4 Merci chocolates and makes a snazzy gift whenever you need to say "merci."


I used the Bloomin' Love stamp set for my "xoxo" sentiment and cut it out with the Classic Label punch and notched the ends using the same punch. A window was created vertically using that same punch, then my heart was glued vertically to act like a button in the slot. I used the Bundle of Love Specialty Designer Series Paper for my hearts. The longer heart is cut using the Lots to Love Box Framelits and I gold embossed the floral stamp from a stamp set that I can't remember!

Please see Julie's blog for complete instructions to make this box.

Use my Online Store any time you need Stampin' Up! supplies.


Tuesday, August 22, 2017

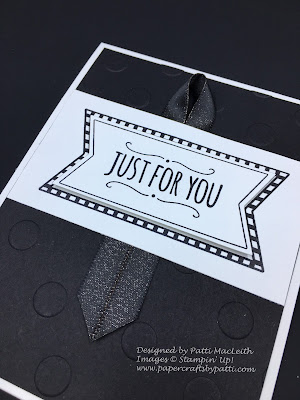
Black and White Happy Birthday


This black and white birthday card (for my favorite police officer) was simple to put together and looks pretty elegant, if I do say so myself!


One stamp, two colors of card stock and a little ribbon go a long way to set on to of this lovely polka dot-embossed base.
I stamped the sentiment and then cut out just the inside using the Mini Treat Bags Thinlit that matches this shape. I set it on a strip of Whisper White card stock that was also stamped with the same stamp, but I popped it up on Stampin'  Dimensionals to make it look extra special.

Thanks for looking today and I hope you have a great day! Won't you use my Online Store when you are ready to purchase your own Stampin' Up! supplies? Thank you!
post signature

Wednesday, January 20, 2016

Wedding Shower Tag

Wedding Shower Gift Tag
I went to a wedding shower last weekend and I created a tag for my gift using the Bloomin' Hearts Thinlits Die and Gold Foil Paper. My Hearts Collection Framelits (retired) perfectly cut a heart background from Blushing Bride (appropriate name!) Glimmer Paper. 
 
Close up showing shiny foil and sparkly Blushing Bride Glimmer Paper
The Pink Pearls, string of pearls, sequins and Blushing Bride Satin Ribbon come from the Love Blossoms Embellishments Kit. The sentiment is from Tin of Cards and is embossed using White Embossing Powder. The heart shape is cut using the heart from Mini Treat Bag Thinlits Dies.


The tissue is really gold, but shows yellow in the photo.
Here is how the tag looked on the bag. Sorry, the bag doesn't fit into my light box for a better photo! 


This is a photo of the bouquet that will be used for the rehearsal.  (You can see my tag peeking out underneath). All of the bows and tissue paper from the shower gifts were carefully put together. Isn't it lovely?

Thank you for visiting today. I hope you will come back soon. I hope you leave a comment for me--I love to read each one!

Shop my Online Store for your Stampin' Up! products. Any customer who places a $50 or larger order in January will receive one of these tags:


post signature

Wednesday, January 13, 2016

From the Heart Pals Blog Hop


Welcome to the Pals Blog Hop for January 2016. We are thankful you stopped by to take a look at our new 2016 Blog Hop monthly themes.  This month we are showcasing projects using Stampin’ Up! products featuring a theme from any of the following: Valentine’s Day; Thinking of You; Get Well; or Sympathy. All of these themes come “From the Heart.”  We hope you enjoy our creations.

You may just be starting the Blog Hop or may have come from the previous link from the Line-up on the Pals Blog Hop listing shown below.  The full lineup will help you move along from blog to blog so you may see all the projects.
First try with "From the Heart Theme"

This is the first card I created with a little different theme than suggested. I still have "hearts" but they relate to a wedding anniversary. I have friends who have a February 14th wedding anniversary! They deserve a special card! In my descriptions, you will see our newest products in italics.

Helpful Tips: 
  • I changed up my Love Blossoms Designer Series Paper by using my Blushing Bride Stampin' Write Marker to color in the hearts and dots on the paper.
  • I turned the Blushing Bride Glimmer Paper over to the back side to trim and punch it. It's much easier to get the cut perfect.
  • The heart image from Bloomin' Love was stamped onto Cherry Cobbler card stock using VersaMark. I heat embossed it using White Stampin' Emboss Powder and hand snipped the heart.
  • The banner stamp that says 'anniversary' is from Number of Years stamp set. That means if you own Bloomin' Love and Number of Years stamp sets, you will have TWO banners you can cut out using the Large Number Framelits!

My favorite of the two. Which one do YOU like?

I couldn't stop with one card. This card varies in color, but also in the elements' placement on the card. My background is simpler, but made special with the Happy Heart Textured Impressions Embossing Folder. I actually like this card better, but the photo shows the other one better, I think. What do you think? Won't you leave me a comment?
 
Thanks for visiting. To continue with the hop, please refer to the Blog Hop Line-up below. We hope to see you on next month’s Pals Blog Hop!


post signature

Saturday, July 11, 2015

Masked Hearts on Glassine Tutorial


 Here is my super cute bag, perfect for gifts of the small kind, OR a gift card. I used one Glassine Sheet and the Hearts Decorative Mask sheet with White Craft Ink to decorate the sheet before die cutting it with the Mini Treat Bag Framelits.


First I placed my Glassine Sheet evenly on my grid surface. I taped it in place so it wouldn't move.

Use the grid to evenly place your stamped images. I do not remember which heart I used! Can you spot it? I let the hearts dry for hours and hours to be sure they would not smudge. Then just die cut using the Mini Treat Bag Framelits and put together. Embellish as you like. 

I hope you like my gift bag. Please leave your comments below-they always make my day!

For your own Stampin' Up! supplies, please use my Online Store. 

Built for Free Using: My Stampin Blog


post signature

Sunday, June 28, 2015

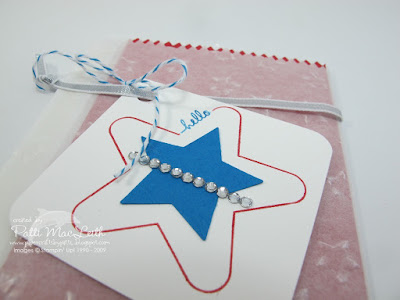
Red, White and Blue

 This is a gift card holder suitable for a birthday near our celebration of Independence Day. I turned the stamp from You're So Sweet so my "hello" would be more vertical than horizontal. Isn't that clever? Well, not really because I really didn't notice which way it was displayed in the catalog :-)


Inside the image, I placed a Tempting Turquoise Medium Star (created with the Medium Star Punch) and then threw a line of Rhinestones across the middle for interest. My square is rounded with the Project Life Corner Rounder.  A bit of Tempting Turquoise Baker's Twine holds the tag onto the Silver 1/8" ribbon. (Twine leftover from a Paper Pumpkin from long ago).

My bag is made from Glassine Paper and the Mini Treat Bag Framelits and Lucky Stars Textured Impressions Embossing Folder. I added a piece of Real Red card stock, whose upper edge was cut using the Mini Treat Bag Framelits also.

Thank you for visiting today. Don't forget to leave a short comment--I really appreciate each one of them.

Built for Free Using: My Stampin Blog

post signature

Wednesday, June 24, 2015

This Week's Specials

Have you been loving some of the projects I've created using the Mini Treat Bag Thinlits Dies? 


Now is your chance to get them at a lower price! Take advantage of $10 off the dies! Also, that Lucky Stars and Polka Dot Textured Impressions Embossing Folders are two of my favorites!! Offer ends June 29th, so use my Online Store to order today! 
 
post signature

Saturday, June 13, 2015

You're So Sweet--Enjoy a Treat!


The Brick Wall Textured Impressions Embossing Folder was my MUST HAVE from the new Annual Catalog. I couldn't wait to use it. Here I used it so that the mortar looks like it's oozing sloppily from the bricks. Most other people have used it the opposite way, having the bricks looked like they are neatly mortared. I like it either way! The great thing about this embossing folder is it is 6" x 6" instead of the normal 
4-1/2" x 6-3/16" as most of the folders are. This means you can emboss more surface area for a wider variety of projects.


My sentiment from You're So Sweet is stamped onto Whisper White using Delightful Dijon ink. Then I stamped the framed sentiment "just for you" in Mossy Meadow onto Whisper White. I cut out just the frame using the Mini Treat Bag Thinlit Dies and it made an excellent frame for my sentiment. I popped the frame up on some Stampin' Dimensionals. I added a black designer button tied with Linen Thread and slipped a length of the new Striped Cotton Ribbon behind it. It's Mossy Meadow. I think this will make an excellent birthday card. There will be a stamped birthday cake of some sort on the inside when I'm ready to send it off.

Thanks for coming by today! I hope you will leave me a comment!

For your Stampin' Up! products, please use my Online Store.


Built for Free Using: My Stampin Blog


post signature

Thursday, January 22, 2015

Just For You


Inspired by Mary Fish's take on a Mojo Monday sketch a few weeks ago, I created the above card. It was easy for my workshop attendees to put together once I had cut everything out for them! I love the colors in this Best Year Ever Designer Series Paper. You can get your paper by placing an order 0f $50 and choosing the paper from the many items in the Sale-A-Bration brochure. Click on the brochure on my right sidebar to see all of the items available.


My sentiment was made easy by using the "for you" from the Mini Treat Bag Thinlits Dies collection. There are two sentiments, a heart which will frame the Full Heart punch perfectly, a star shape, a row of dots, a row of stars a row of hearts, a piece of "washi tape" and a thin, tied bow. And, of course there is the bag shape. I'll be showing some samples tomorrow!
Built for Free Using: My Stampin Blog


post signature