Showing posts with label Perfect Pennants. Show all posts

Monday, April 11, 2016

PPA295 Color Challenge


I hope you enjoy my last minute entry to the Pals Paper Arts challenge for last Thursday. I've got lots of cards to show you, but so little time to blog them! Stay tuned and enjoy!

As usual, you may order any time (even when I'm very busy) through my Online Store.

Card Supplies:
Card Stock: Cucumber Crush, Very Vanilla, Bermuda Bay, Crumb Cake
Stamps: Perfect Pennants
Ink: Bermuda Bay, Cucumber Crush
Stampin' Write Marker: Crumb Cake
Big Shot: Chalk Talk Framelits, Lucky Stars TIEF


post signature

Sunday, May 17, 2015

Life Doesn't Have To Be Perfect


I love that I really had no idea what would be created when I sat down to this beautiful new Tip Top Taupe Dotted Lace Trim from Stampin' Up! I knew I'd like to pair it with the Typeset DSP and Basic Black. (The new Dotted Lace also comes in the other new In Colors!)

My card base is Ivory Naturals card stock, which sadly, is retiring. I will miss it! It has teeny fibers and flecks in it and is slightly more sturdy than Very Vanilla. It's great for a vintage look.

The Butterfly Basics Basic Black butterfly looks stunning against the print background. She is adorned with pearls to match the vintage feel.

My sentiment is from Perfect Pennants (I'm so glad it will remain in our annual catalog) and is stamped in the new Tip Top Taupe ink. I'm loving this new In Color! I cut it out perfectly using the Deco Labels Framelit. Three teeny pearls adorn the bottom.


My Dotted Lace Trim is adhered with a length of Sticky Strip (also retiring!) The last retiring bit from my card is the Simply Pressed Clay flower that I created using the Buttons and Blossoms mold. I colored it using the Tip Top Taupe Stampin' Write Marker and then added some shimmer with my Wink of Stella pen.

All of the new products I mentioned will be available to order on June 2nd!

If you enjoyed my card, won't you please take a few seconds to comment? I love to read your comments!

When you need to order Stampin' Up!, just use my Online Store.
Built for Free Using: My Stampin Blog


post signature

Friday, September 12, 2014

Gift Box in Three Simple Steps!


  • 1. Cut Brushed Silver card stock to 7" x 7"
  • 2. Score on Gift Box Punch Board: M start line, S Diagonal line
  • 3. Fold on score lines to assemble box
  • 4. Decorate--okay, there are more than three steps, but the decorating is the fun part!


To decorate my box:
  • I tied a knot using the Cherry Cobbler 1" Sheer Linen Ribbon
  • I stamped the heart from Perfect Pennants onto Whisper White and punched it out using the Sweetheart Punch
  • I punched a hole in the heart using my Crop-a-dile
  • I used a piece of Silver 1/8" Ribbon to attach the heart to the Cherry Cobbler ribbon. 
  • I added a single Basic Rhinestone.
I hope you enjoyed my project today. If you haven't had a chance to use the Gift Box Punch Board, you can order yours today by using my Online Store. I can tell it's going to be a fun and useful tool to use year-round for gifts, favors and all kinds of surprises!
   
135863                                    Gift Box Punch Board
post signature

Thursday, September 4, 2014

PPA Color Challenge: Honey Crumb Berry


I knew I wanted lots of layers when I saw this color combination. I decided to keep it on the lighter side using Crumb Cake as my card base and stamping Blackberry Bliss splotches from Gorgeous Grunge for a little bit of interest. I added a neutral Very Vanilla matt for stamping my Gorgeous Grunge elements in Hello Honey.


Next, I stamped a bunch of the banner, heart and dots/stripes elements in all three of the challenge colors onto Very Vanilla card stock. I played with them until I was happy with which colors to use. My heart is cut out using the Snowflake Card Thinlit die. "Hello" was cut out using the Banners Framelits. I decided to add Naturals Chevron vertically and a piece of Venetian Crochet Trim horizontally. To finish my grunge vs. antique look, I added a single Basic Pearl to my heart.

What do you think? How will YOU answer the challenge? Please play along! I'd love to read your comments!

You can order Stampin' Up! supplies any time using my Online Store.

Color Challenge Card Stupplies:
Card Stock: Very Vanilla, Crumb Cake
Stamps: Gorgeous Grunge, Perfect Pennants
Ink: Hello Honey, Crumb Cake, Blackberry Bliss
Big Shot: Banners Framelits, Snowflake Thinlit Card Dies
Embellishments: Basic Pearls, Natural Chevron Ribbon, Venetian Crochet Trim


post signature

Wednesday, September 3, 2014

Sending Good Thoughts in Black and White


Hello friends! When in a pinch, make a Clean and Simple card! I covered my entire 4-1/4" x  5-1/2" card front with the feather print from Back To Black Designer Series Paper. Next, I adhered a scrap piece of a second print (same DSP) across the entire front. 


I stamped my sentiment from Perfect Pennants onto Whisper White using Basic Black ink. Perfectly cutting it out was easy using the Banners Framelits and my Big Shot. I added a piece of 1/8" Basic Black Taffeta Ribbon tied horizontally into a knot across the top of the second DSP print. Done.

I hope you enjoyed looking today! Don't forget to come back tomorrow for my fun and colorful Pals Paper Arts Challenge card! I hope it will inspire you to play along!

Please use my Online Store to order your Stampin' Up! products.

CAS Black and White Card Supplies:
Card Stock: Whisper White
Designer Series Paper: Back To Black
Stamps: Perfect Pennants
Ink: Basic Black
Big Shot: Banners Framelits
Embellishments: 1/8" Basic Black Taffeta Ribbon

post signature

Thursday, March 27, 2014

PPA197 Make A Wish


I'm playing along with Team 2 at the Pals Paper Arts Challenge. I used my Gorgeous Grunge and Perfect Pennants stamp sets to make this design come together.


For the bottom part of the design, used the This and That Epic Day designer series paper and cut a section 4" across. Then I simply cut the two patterns apart in the hexagon edge. Then I turned one upside down so they sort of matched. I matted each one with a piece of coordinating card stock and hand snipped the edges to match the shapes. Great edge, I think!

I hope you enjoyed seeing my creation and that you will take a few seconds to comment. I love reading all of your comments and I will respond if possible.

When you need Stampin' Up! products for your creations, please use my Online Store. Only a few more days to take advantage of Sale-A-Bration where you receive a free product for each $50 in product that you purchase! Details here.

PPA Make a Wish Card Supplies:
Card Stock: Very Vanilla, Gumball Green, Calypso Coral, Daffodil Delight
Designer Series Paper: This And That Epic Day
Stamps: Perfect Pennants, Gorgeous Grunge
Ink: Gumball Green, Daffodil Delight, Calypso Coral, Pool Party


post signature

Friday, January 24, 2014

50th Birthday Party in a Box!


I found this tutorial through Heidi Baks' blog post from last week. It's like a party in a box! I had to give it a try for my sister's 50th birthday that is coming up next month. I used retired designer series paper because it was my second try (first try I made it upside down!)

I added a piece that says, "Make A Wish" and propped it up on a piece of Window Sheet. It folds down so it fits inside the card when it's closed. She will have to unfold it and uncrease it a bit for display. 

I used that sentiment  because my sister and I used to watch "Make A Wish" with Tom Chapin on Saturday mornings. Do you remember the show? Answer in my comment section--let's see how many of us are of a certain age out there!


If you follow the tutorial, your card will be larger than an A2 card. If you want it to fit into an A2 envelope, follow the same steps EXCEPT:

  • Cut your card stock 4-1/4" x 12 instead of the size listed
  • After scoring (same place as instructions) and rotating 90 degrees, score at 1-3/4"
  • For the inside strips on my box (I used 3) I cut them 1" wide and 3-3/4" long. I scored them at 1/2" on both ends
Hint: I found that using Tombow glue for the strips was easier than using Sticky Strip. The glue dries pretty quickly. 

There really is no end to how you can embellish this "box" and send it along for any special occasion. It's like a gift in itself!
Thanks for stopping by today. You can click on any of the products above and arrive at my Online Store for easy ordering.

50th Birthday Party in a Box Supplies:
Card Stock: Baked Brown Sugar, Whisper White, Tangerine Tango, Island Indigo
Specialty Paper: Champagne Glimmer and Window Sheets
Designer Series Paper: Sycamore Street (retired)
Stamps: Label Love, Perfect Pennants, Pretty Petites, Starburst Sayings
Punches: Petite Curly Label, Artisan Label, Cupcake Builder, Small Star (retired), 1-1/4" Circle
Embellishments: Basic Rhinestones

post signature

Friday, September 6, 2013

Creative Crew Catalog Focus


This Creative Crew Challenge was to use a stamp set from pages 111-119 in the Annual Catalog and make something in a new way for me! I used the Happy Day stamp set and the Double Z Fold on this card. We were also to keep two colors from the Eastern Elegance challenge (you will see that card tomorrow!) and I used Coastal Cabana and Smoky Slate.


Here is what the card looks like when it's open. There is plenty of room to write your sentiments down and I repeated the border that I have on the outside panels in a vertical way on the top part of the panel inside.


Here is a close up of the main element on the front. I stamped the lacy element from Happy Day lightly onto Whisper White card stock. I cut it out using the Circles Collection Framelits and then added a Smoky Slate border that is from the Perfect Pennants Die. Over the lacy element I stamped "sweet" after coloring just that part with my Coastal Cabana Stampin' Write Marker.  A pearl finishes my elegant circle. The Whisper White Organza ribbon holds my card closed when tied in a bow.

I hope you liked looking today! Play along here: CCREW0913CF

Will you please leave your comments below? I love reading them!

For all of your own Stampin' Up! Products, you may use my Online Store.

Catalog Focus Card Supplies:
Card Stock: Coastal Cabana, Smoky Slate, Whisper White
Designer Series Paper: Eastern Elegance
Stamps: Happy Day
Ink: Smoky Slate, Coastal Cabana
Big Shot: Finishing Touches Edgelits, Perfect Pennants Die, Circles Collection Framelits
Embellishments: Whisper White Organza Ribbon, Basic Pearls


Saturday, June 22, 2013

Colorful Congratulations!


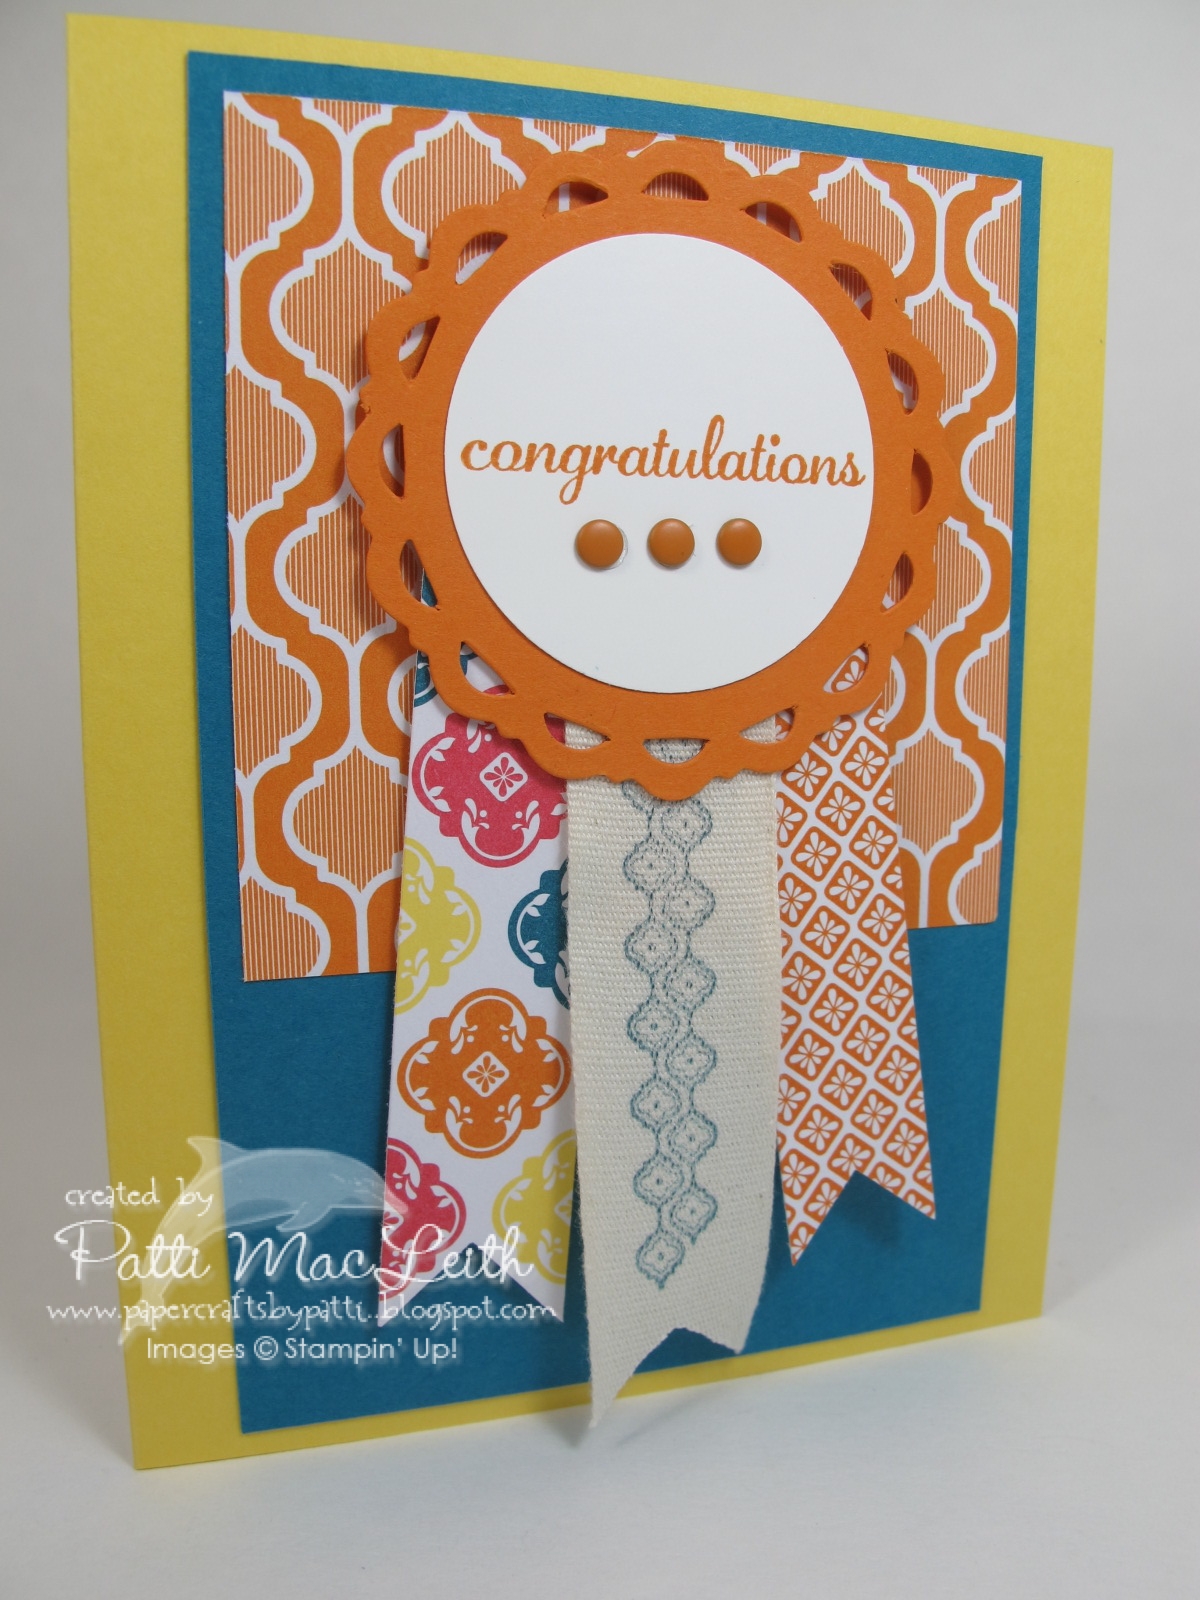
Happy Friday! I love my weekends and this weekend I get to help celebrate a young woman who graduated from college! I love the colors in Quatrefancy Specialty Designer Series Paper, so I began my card knowing I'd be using it. I decided to highlight Pumpkin Pie, Daffodil Delight and Island Indigo. My banners are made from two different patterns of the paper and one piece of 7/8" Cotton Ribbon that is stamped with an image from Mosaic Madness.


For the circle element of my card, I used a 1-3/4" Circle punch in Whisper White, which is matted with a Pumpkin Pie frame from the Perfect Pennants Bigz L die. I stamped the "congratulations" from the Express Yourself (hostess) set. I LOVE the script on the 12 sentiments from this set. I think they are festive and elegant. Underneath my stamped sentiment, I placed three Pumpkin Pie candy dots. SUCH and easy way to accentuate any card. They stick on just like our Basic Pearls and Basic Rhinestones.

Thank you for looking today. I hope you are inspired! Please let me know what you think in my comment section--I really love to read every one!

Congratulations Card Supplies:
Card Stock: Whisper White, Pumpkin Pie, Daffodil Delight, Island Indigo
Designer Series Paper: Quatrefancy Specialty
Stamps: Express Yourself (hostess), Mosaic Madness
Ink: Pumpkin Pie, Island Indigo
Big Shot: Perfect Pennants Bigz L die
Emellishments: 7/8" Cotton Ribbon, Brights Candy Dots

Please use my Online Store any time!

Thursday, November 15, 2012

First Birthday-PPA Sketch!


It's time once again to play along with the Pals Paper Arts Sketch Challenge! Consider using the above sketch to make your card, scrapbook page or any paper project!

This card is for a one-year-old girl ;-) I couldn't decide which colors to use, so I started with the card base in Wisteria Wonder. I was fairly certain she would get a lot of pink cards from others. The designer paper coordinated perfectly from Patterns 2011-2012 In Colors. Whisper White was the perfect neutral. My bow is Perfect Plum which adds another shade in the purple family. My cupcake frosting was punched from a retired designer series paper that I couldn't resist keeping a scrap of!


I hope you enjoyed looking and will leave your comments below--I love to read them all!

First Birthday Card Supplies:
Card Stock: Wisteria Wonder, Whisper White
Designer Series Paper: Patterns 2011-2012 In Colors-Wisteria Wonder
Stamps: Pennant Parade, Create-A-Cupcake, Perfect Punches
Ink: Wisteria Wonder
Punches: Cupcake Builder, Large Oval
Embellishments: Perfect Plum 3/8" Taffeta
Adhesives: Snail, Sticky Strip, Stampin' Dimensionals

For all of your Stampin' Up! supplies, please use my Website to order.

Thursday, September 20, 2012

PPA143-Howling Good Sketch


Another challenge from Pals Paper Arts! I hope you will not only consider playing with us, but that you will actually pick up your supplies and create, using the above sketch by our Design Team member, Margaret Moody as your starting point!

I had a howling good time getting ready for Trick-or-Treat season by using Howlstooth and Scaringbone designer series paper from Stampin' Up's current Mini Catalog. The colors are *so cool* and my favorite pattern is the houndstooth I chose for this card.


Here is a close up of the banner, which I used the Petal Cone Die to cut. Then I centered my sentiment, "Trick or Treat" (which is inked with Tangerine Tango and Basic Black Stampin' Write Markers) using the Stampa-ma-Jig to get perfect placement. A couple of score lines using the Simply Scored Scoring Tool and I now have a popped-up banner.


Mistakes sometimes happen and here is one time where I made the best of one! When I placed my square of Tangerine Tango card stock onto the die to cut this round mat, one teeny scallop edge did not get rounded! I did not notice this until I had already adhered the cauldron image using Stampin' Dimensionals. So, I quickly snipped each and every scallop, and now I have a brand new shape! I was way too tired to start over again at that point! 

Thank you for visiting my blog today. I hope you have a wonderful weekend. I won't be posting much in the coming week, due to our son's wedding, but I hope to be back in my studio soon and posting more cards for you to see and be inspired by!

Howling Good Card Supplies:
Card Stock: Basic Gray, Very Vanilla, Tangerine Tango, Basic Black
Designer Series Paper: Howlstooth & Scaringbone
Stamps: Toxic Treats
Ink: Basic Black
Markers: Basic Black, Tangerine Tango
Big Shot: Petal Cone Die, Perfect Pennants
Punches: 1-3/8 Circle
Adhesives: Snail, Sticky Strip, Stampin' Dimensionals

For all of your Stampin' Up! supplies, I hope you will use my Website to order.

Wednesday, July 11, 2012

Memories... and a Free Treat Reminder!


Long time no blog! I got a little busy. I hope you missed me :-)
The above card came together quickly because I could really dress up the sentiment from "Blessings from Heaven" just by stamping it onto one of the elements from the Perfect Pennants Bigz Die. Then, because I just couldn't leave it alone, I used my new Stampin' Pierce Mat and Essentials Paper-Piercing  Pack to punch a perfect circle with my Piercing Tool. It adds so much!

I hope you enjoyed looking! I enjoyed all of your nice comments from last week and I hope for more today! Have a great day~don't forget to get your free Slurpee at 7-11 today only!

For all of your Stampin' Up! supplies, I hope you will check out my Website. It's easy to order!

Memories Card Supplies:
Card Stock: Crumb Cake, Cherry Cobbler, Whisper White
Designer Series Paper: Twitterpated
Stamps: Blessings From Heaven
Ink: Cherry Cobbler
Big Shot: Perfect Pennants Bigz Die
Punches: Scallop Ribbon Border
Embellishments: Baja Breeze Seam Binding Ribbon, Everyday Enchantment Brads (retired)


Thursday, November 3, 2011

PPA118 Color Challenge


This week our Celebrity Guest Artist is Carrie Gaskin and her blog is titled Artistic Avenger. Please check out her work, as well as all of our Design Team and Pals Paper Arts participants.

When I first saw these Challenge Colors, I was worried. How would they look together? What supplies would I use? Then it all came together, once I decided to use the above print from Well Worn designer series paper! The wood-look print was a perfect starting point, incorporating the Early Espresso/Chocolate Chip/Soft Suede in the grain of the print. Make the base of the card River Rock offset all of the darkness in the print.


I then decided that my element would bring all of the colors together by using the neutral colors of Naturals Ivory (1-3/8" circle) and Basic Black (1-3/4" circle). These were matted with the lighter River Rock scalloped circle from the Perfect Pennants Die and using my Big Shot. LOVE my Big Shot! Have you seen the extended promotion for a *free* Big Shot? Details here.

Supplies List:
Card Stock: Early Espresso, Soft Suede, River Rock, Naturals Ivory, Basic Black
Designer Series Paper: Well Worn
Stamps: Happiest Birthday Wishes
Ink: Chocolate Chip
Punches: 1-3/8" and 1-3/4" circle
Extras: Big Shot, Perfect Pennants Die, Silver Mini Brads, Stampin' Dimensionals, Snail adhesive